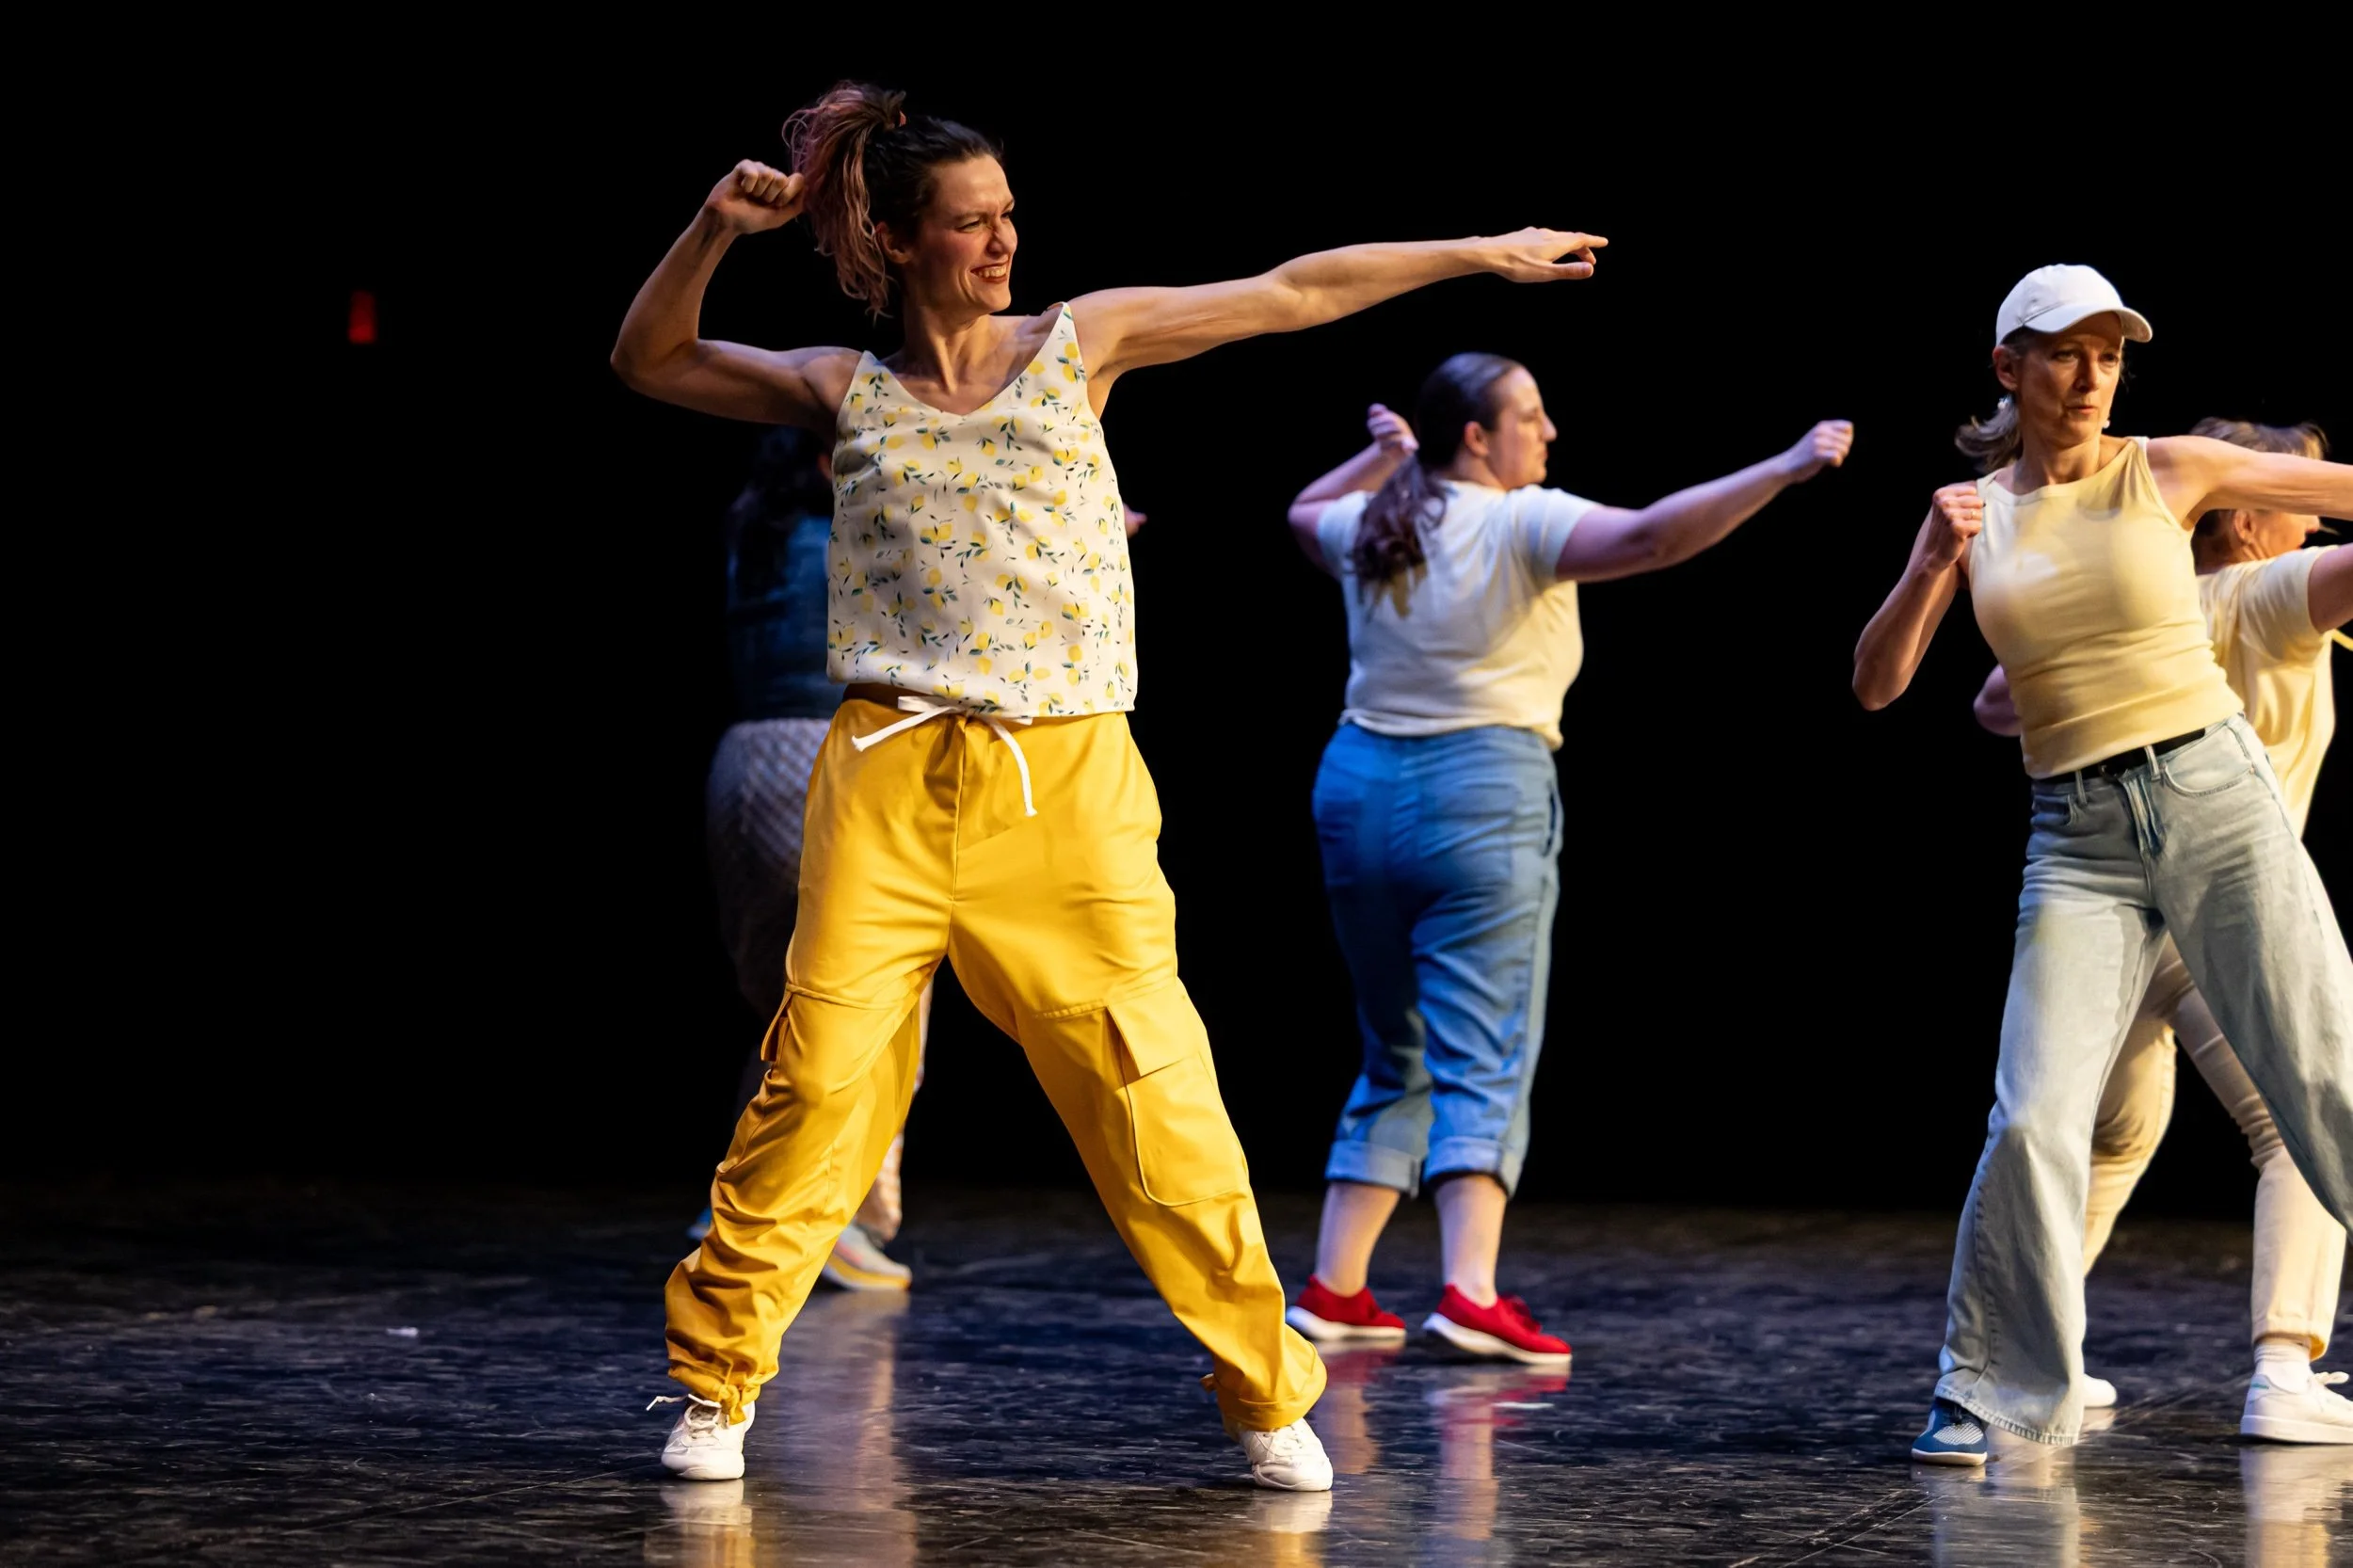
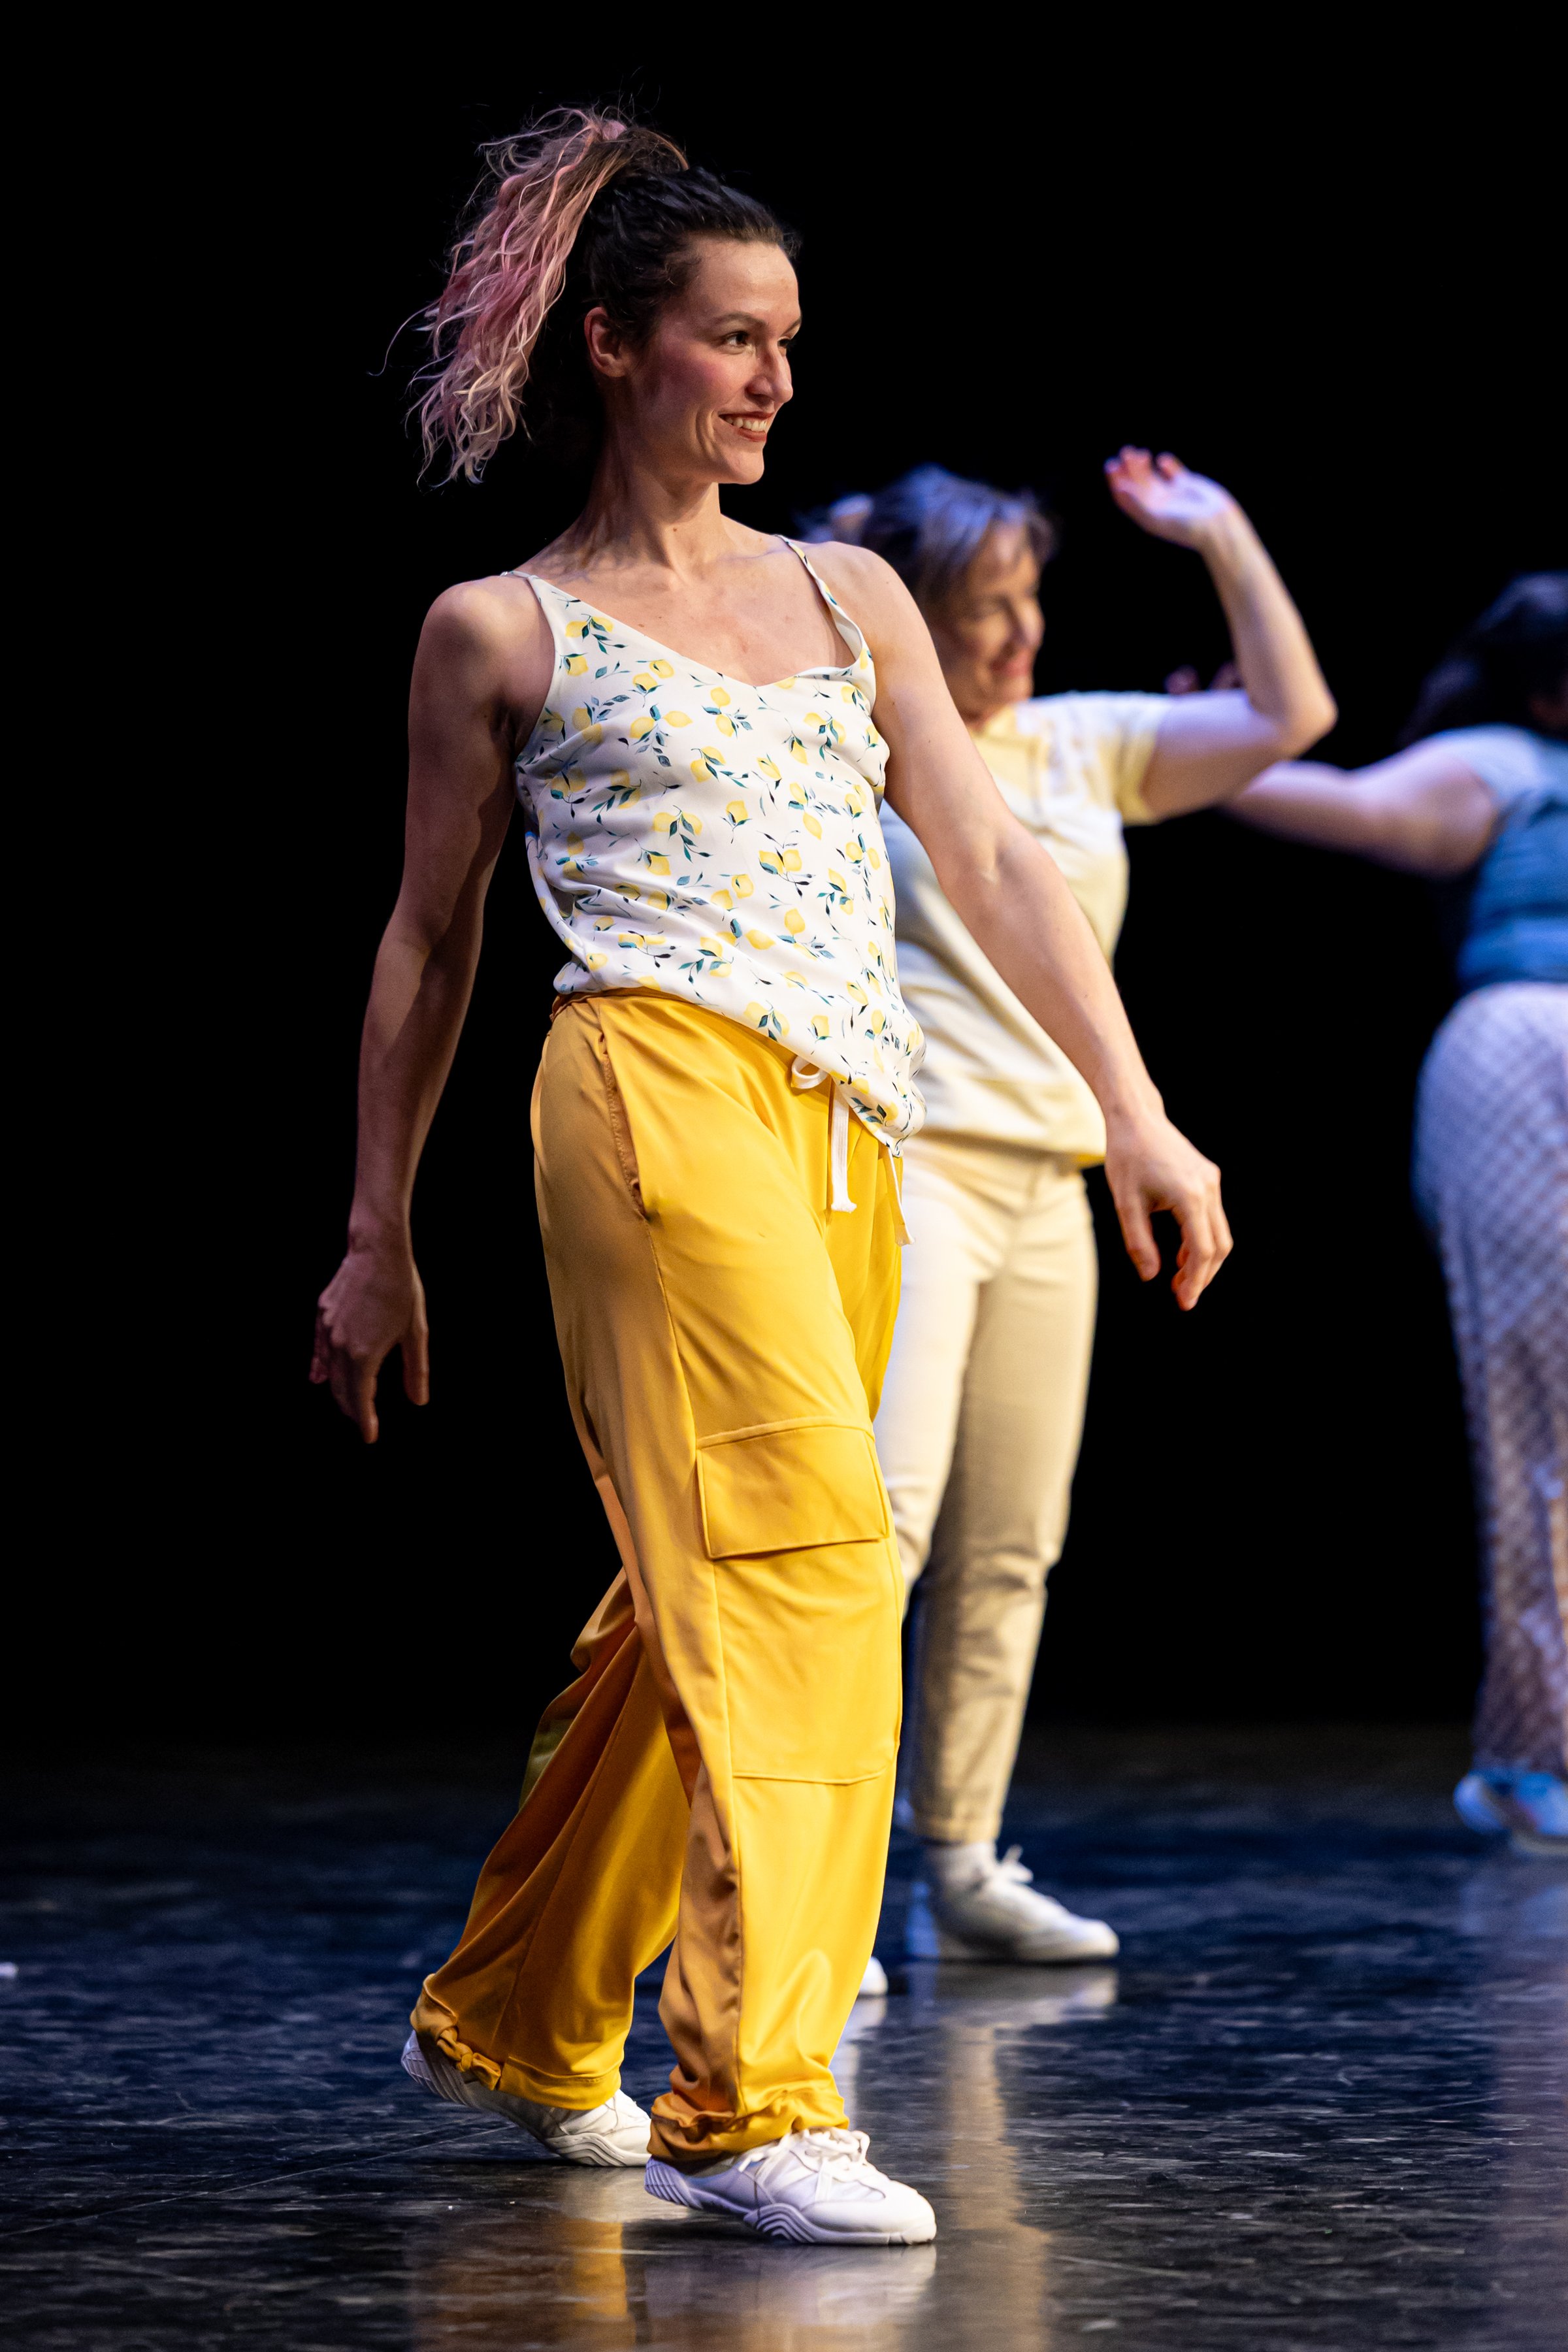
Lemonade pants


This year’s hip hop class called for end of year performance outfits consisting of yellow, denim and white. I volunteered to be one of the people who’d wear yellow bottoms since I figured I could make something reasonably cool and I absolutely don’t need a yellow top in my arsenal.
Before I get into the making details, a shout out to the incredible photographer Michelle Berg, who shot our recital, and who took all photos used in this post.
I found the fabric first, keeping an eye out for something bright yellow and athletic. I found this pattern, New Look 6223 at Nefelibata, the local second hand craft shop. It’s made for wovens, but I just ignored that as the yellow I’d managed to secure for this project (not a colour I keep on hand) was a reasonably thick synthetic knit from Our Social Fabric. I don’t think this was a particularly sensitive pattern for knits v. wovens. I was and am particularly interested in the lower pockets as a design element, and thought the view with a purchased belt was a neat detail. Also, this is one of those patterns in my collection that I’m not finding a lot about online.
Making these started smoothly then went off kilter a bit. Overall feelings about these is that they’re great as a costume piece but I don’t think they’ll get as much wear as I’d like because of the sweaty feel of wearing a synthetic sweatpant.

Pressing this fabric was not particularly fruitful, so top stitching with stretch was essential. To do this, I made heavy use of the somewhat coverstitch looking stitch and the triple straight stitch. I think the triple stitch was significantly more successful and cleaner looking. I used this approach on the pockets and front horizontal seam and I’m quite happy with the look. Faux coverstitch looks messier, but helped me do some of the channels with fewer passes.
I waffled about adding the top inseam pockets but decided they were worth having from a practical point of view. This was mostly the right choice, but there’s a trade off with a bit of bulk and show-through as a result. Because of the bulk and show-through, I went ahead and skipped the front zip. With the stretchy knit and the overall size of these pants it wouldn’t have done anything anyway, and I don’t think the design lacks that much visually from the omission. This is the one place where I do wonder if using a woven would improve results, since some funky stuff was happening with the front shape. I’ll get to that in more detail in a minute.
The waistband is where the making experience shifted into frustration, in part because this is when I switched to the faux coverstitch. An absolute pain to unpick, and the unpicking more obviously needed in some places. . I also started to go further off piste at this point, and recognizing that pants that get all their gathering from a belt or tie you cinch up can be soooo loose and annoying to put on, I thought an elastic built into the waistband could improve wearability. Let me tell you it looked like TRASH but I’d inserted it using the coverstitch approach (why i didn’t baste first i do not know don’t ask me i hate it) and had to take a long time removing those stitches.
I switched back to the pattern as designed, making the waistband as effectively a giant belt loop. I also decided to add a second pass of “coverstitch” stitches to make the waistband channel a bit smaller since the weight of the fabric had turned me off the idea of using a belt. I wanted something lighter, but still a bit of contrast, so purchased a bit of cotton flat drawstring to pass through, and I wanted the opening to be a bit more snug to maybe keep this in place (it doesn’t really, oh well). Towards the end of this second pass my machine started to hemmorhage and create a massive thread nest, which I unpicked. I rethreaded my top thread and tried again. Nest, unpick. I changed the needle. Nest, unpick. I cleaned the bobbin area. Nest, unpick. Why I didn’t switch to doing test runs on a scrap of fabric? I can only say I was already in a mood and wanted a win badly enough that I was not thinking practically. This last run of unpicking I snipped a tiny hole in my fabric and truly felt overwhelmed by sadness.
The next day I re-cleaned everything in the bobbin case, put in a needle from a fresh pack (since I’m not always careful to mark which needles are used or not), and tested on scraps. I kept cleaning the top mechanisms as well, but it took several tries and tests and cleans to finally dislodge a small chunk of thread from the tension disks and then all was magically solved. I finished my stitching and though I’m none too pleased with the look of the topstitching right at the top of the waistband (I think it stiffens the pants too much, creating an almost paper bag effect…. emphasis on almost as in not quite enough to look even a little on purpose) I don’t yet think I’ll remedy it in any way.
Finally, the view one ankle hems are done in the same way as the waistband, but I reduced the topstitching and it looks much better. I kept self fabric ties here and like that it could be worn without the ties or with the ties loose as well. The bows should really be on the outside of the ankles and would look much better that way, but I made a mistake on the first one I assembled and was well into the “just finish the project” mentality by then.
The final adjustment was to take out a large wedge (we’re talking inches) at CF down to the crotch curve. Basically I found that the pattern marked the openings for the waistband drawstring significantly further back than looked and felt right, and the front was folding in on itself in a not super secure way. This is where I wonder if a woven would have behaved differently… In any case, there are some issues with the shape at the front that I can certainly see when I look at these photos, but I’m fairly certain are only obvious to sewing people. If I were to make these again I would absolutely make a pattern adjustment to the waistband to fix this space issue without taking a chunk from CF, which would also add more gathering around the waist and look a bit more balanced overall.

Pattern: New Look 6233
Size made: 16 (40 in hips, 30 in waist) could probably size down.
Materials: yellow performance knit from Our Social Fabric, cotton drawstring (new, bought locally), polyester thread, scrap of bias tape to face CF waist where the waistband loop is not covering.
My measurements: 39” hips, 31” waist
Next time: Extend waistband piece so openings are closer to CF., or size down Might be nice in a lightweight cotton/linen. Double check ankle channel alignment before sewing! Embrace basting when in doubt!